Approval Group Options
In ChangeGear, Approval Group options allow you to easily select your approvers per state, group them by certain criteria, arrange them in a sequence, and set conditions for their approvals.
Determining Approvers
If you have created multiple approval groups, only one group is applied per ticket per state. ChangeGear determines which approval group to apply to a ticket, based on the following hierarchical list.
-
Approval Groups specified in the Workflow Designer.
-
Approval Groups based on criteria selected in the Approval Group Settings.
-
Approval Groups based on ticket Type selected in the Approval Group Settings . For example, when an approval group is for a service request ticket, Type can be hardware request, software request, etc.
-
Default Approval Group.
Grouping Approvers
By default, approvers receive ticket notification in sequence: Approver 1 receives notification of the ticket, and after they approve it, Approver 2 receives notification, and so on. However, you can group two or more approvers so the approvers receive notification at the same time.
To group approvers:
-
Double-click the Approval Group you want to edit to view its properties.
-
Select an existing Get Approval card to edit. To add a new Get Approval card, hover over a transition line below the Approver Group card to view and click the
 icon. The Get Approval Properties display.
 -
To add approvers, click the
 icon under Approvers. In the Users, Teams, Roles, or Dynamic Roles, tabs, select the approvers you want to group together by double-clicking a user, or by selecting a user and clicking the Add button. Do this for each of the desired entries.
 -
Click
 to Save.
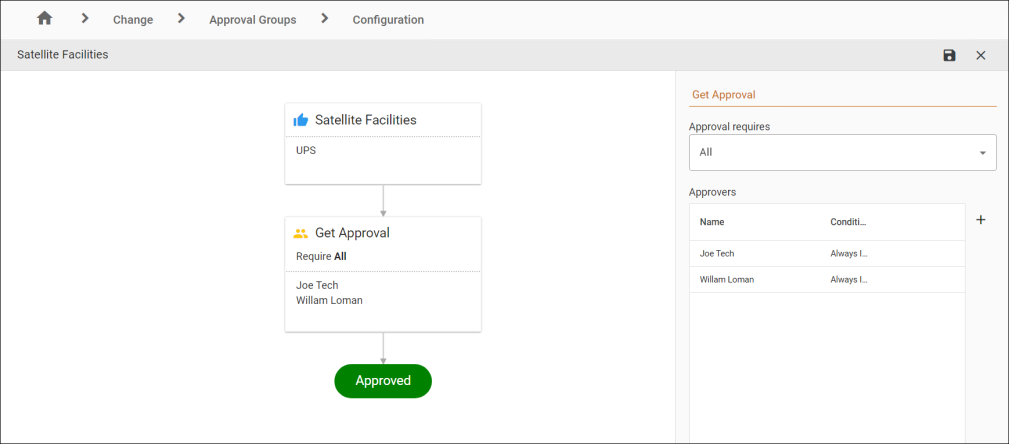
The approvers you grouped will receive notifications simultaneously.
Sequencing Approvers
Approvers can receive ticket notification in sequence by adding/modifying users in separate approver cards in the sequence you prefer; Approver 1 receives the ticket before Approver 2, and so on. You can modify the approver sequence to suit your needs.
To modify the approver sequence:
-
Click the Administration tab and select Design Studio.
-
In Design Studio, click All Apps, or navigate to the desired app (i.e. Change), then select Approval Groups. All Approval Groups display.
-
Double-click the Approval Group you want to edit to view its properties.
-
To change the order approvers, select an existing Get Approval card and drag it up or down. Repeat this as necessary. each additional approver.
-
Click
to Save.
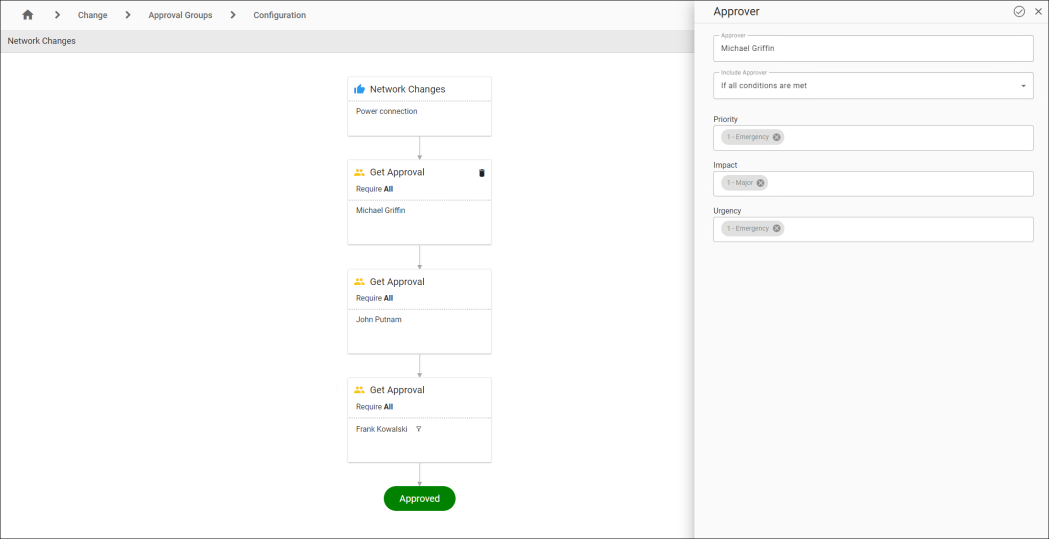
Specifying Conditions for Approvers
You can use conditions such as ticket impact, urgency and priority to determine which tickets an approver receives for approval.
To specify conditions:
-
Click the Administration tab and select Design Studio.
-
In Design Studio, click All Apps, or navigate to the desired app (i.e. Change), then select Approval Groups . All Approval Groups display.
-
Double-click the Approval Group you want to edit to view its properties.
-
In the Get Approval card, select the appropriate approver. By default, the Approver is always included; choose whether you want the approver to be included If all conditions are met or If one or more conditions are met to reveal additional options.
-
Under Priority, select the change priorities you want the selected approver to approve. You can also deselect priorities from which you want to exclude the approver.
-
Under Impact, select the change impacts you want the selected approver to approve. You can also deselect impacts from which you want to exclude the approver.
-
Under Urgency, select the change urgencies you want the selected approver to approve. You can also deselect urgencies from which you want to exclude the approver.
-
- Click to Save.