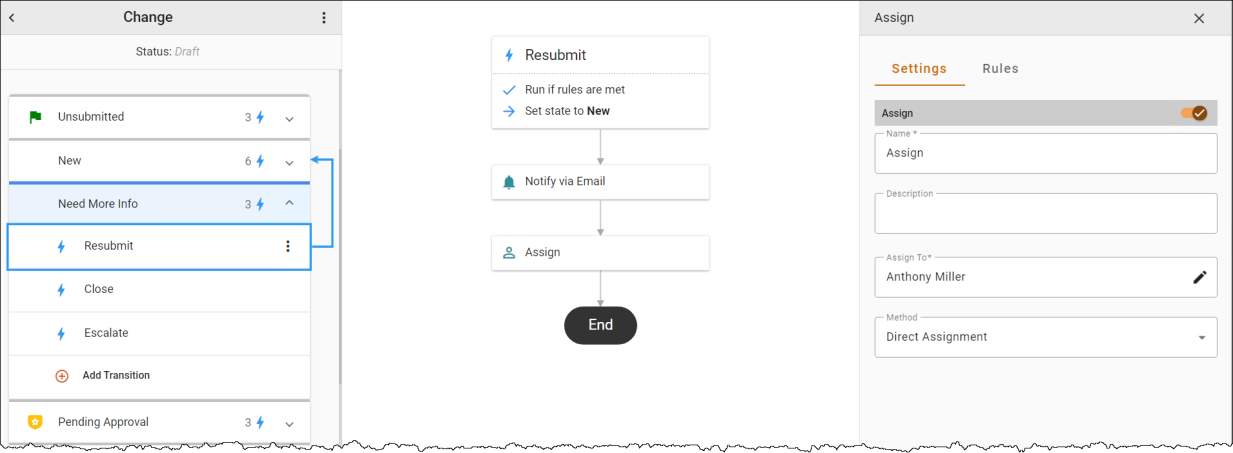
Assign
The Assign automation lets you automate assignments of tickets based on conditions. In addition to directly assigning tickets to specific users, you can dynamically assign tickets to members of a team, role, or dynamic role based on certain criteria. Each of these methods is explained in more detail below.
To create a new assign automation:
-
Hover over a transition line below an action to view and click the
 icon. Select the Assign automation in the Select automation... drop-down. The Automation Properties Panel displays.
 -
In the Name field, enter a name for the automation.
-
In the Description field, enter a description of the automation.
-
In the Assign To list, select the user, team, role, or dynamic role to whom you want to assign/reassign the Task or RFC. Click
 to Save.
Note: The contents of the Assign To field may change based on which Assignment Method is selected.
-
Select an Assignment Method. The Assignment Methods are described in more detail below. Direct Assignment is selected by default.
-
Select the Enable toggle to enable the assignment action.
-
Optionally, select the Rules tab to specify which tickets will be processed by this action. For more information, see Adding Conditions to Automation.
-
Click the 3-dot menu
 next to the workflow name, then Save or Publish the workflow to see your changes.
Assignment Methods
The assignment method determines how ChangeGear assigns incoming tickets to users. You can select one of three assignment methods: direct assignment, round robin, and load balanced.
Direct Assignment
Direct assignment specifies a single user, team, role, or dynamic role that new tickets will be assigned to. Each ticket processed by this rule will be automatically assigned to the user, team, or role, regardless of their current ticket load or availability.

Round Robin
Round robin assigns incoming tickets to individual users in a team or role sequentially. ChangeGear assigns one ticket to one user, then assigns the next ticket to the next user, and so on. When the last user in a team has been assigned a ticket, ChangeGear assigns the following ticket to the first user and starts the cycle again.

Load Balanced
Load balancing evenly distributes tickets to users in a team or role based on the number of items already assigned to them. The user with the fewest items is assigned the new ticket. ChangeGear determines each user's load using the following criteria:
-
The number of tickets and tasks in the current module that are assigned to the user and are not in the End state
-
Whether the user is currently out of the office (if Calendar Integration is enabled, see more details in the DT Client Help under Administration > Global Settings > Calendar Integration)
For example, if you were to enable load balancing for the default Workflow in the Incident module, ChangeGear would assign new tickets to the user with the lowest number of incident tickets and tasks that are not in the Closed state.

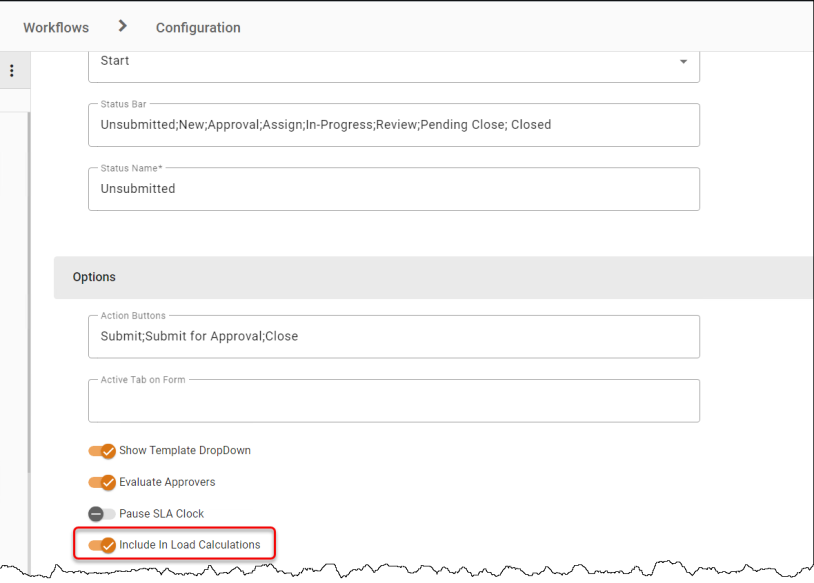
Changing the Load Balancing Criteria
You can specify which States should be included in load balancing calculations. By default, all States are included except for End States (States where the Type property is set to End, such as the Closed State. However, you can specify which States should or should not be included by changing the State's IncludeInLoadCalculations property.
To add or remove a State from the load balancing calculation:
-
If necessary, open the workflow that you want to edit in the Workflow Designer.
-
In the Left Panel, select the State that you want to modify.
-
In the Properties tab, under Options, select the toggle to Include In Load Calculations to add the State to the load balancing calculation. To remove the State from the load balancing calculation, deselect the toggle option.
-
Click the 3-dot menu
next to the workflow name, then Save or Publish the workflow to see your changes.
Once you set the Include In Load Calculations property of any State to enabled, ChangeGear no longer uses the default behavior of counting all States that are not the End type. Instead, it only counts items that are in those States whose Include In Load Calculations property is set to enabled. You can revert to the default behavior by setting the value of Include In Load Calculation to disabled for all States.