Setting Up Email Connector
Before you can begin using the Email Connector, you must first set it up in Web Administration.
Setting up an Email Connector
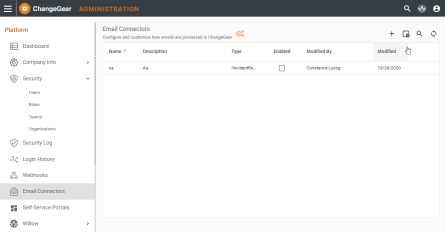
- In Web Administration, click Email Connector. ChangeGear displays the list of all created Email Connectors. The settings apply to all the Email Connector profiles in the grid.
- Configure the Email Connector service settings by clicking on the orange gears button
 at the top-left of the grid next to the Email Connector title. ChangeGear displays the Email Connector Settings slide-out editor. You must click save
  for changes to persist.

Enabled - This is the main switch for Email Connector service. Note: ChangeGear doesn't alter the Enabled status of the Email Connector profiles when you change this setting.
Connect using - You can set this to a POP3 or Exchange Web Services service provider. All Email Connector profiles must use the same email service provider. Switching between the two settings will echo to all the available email connector profiles in the grid.
Interval to process mailbox in minutes - Email Connector checks for new emails every 5 minutes by default. You can configure how often the Email Connectors should check for emails. The minimum value is 1 minute; the maximum is 525600 minutes.
Notify in the event of a service issue- You can enter the email address for a contact to notify in the event of a service issue.
Message Filter-You can enter filter criteria then hit Enter to apply. Email Connector will ignore incoming emails with the specified filter criteria in the email Subject. To remove a filter, click the x to the right of the filter criteria.
Restart Service- You can click this button to restart the Email Connector service.
-
Next, set up the individual Email Connector profiles. To create a new Email Connector profile, press the + button at the top right side of the grid. Then fill in the required Name field in the grid and then click save button. The Description and Enabled fields are optional.
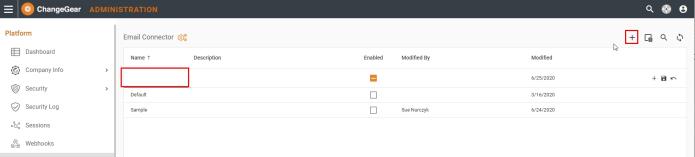
- To edit an Email Connector, hover over the row and click the pencil icon. ChangeGear opens up a slide-out editor which contains detailed information about that specific email connector.
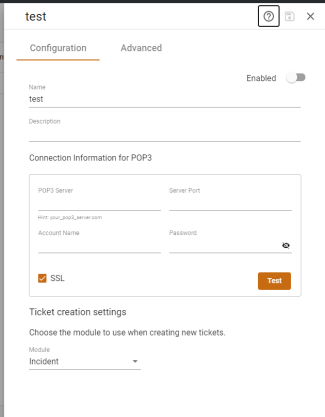
There are two tabs on this slide-out editor: Configuration and Advanced.
Setting Configuration Options
- On the slide-out editor, click the Configuration tab.
- Toggle Enabled to enable this Email Connector.
- In Name, enter a meaningful name that can easily identify the purpose of the email connector.
- In Description, enter the purpose of the Email Connector.
- Connection Information shows information on the account. The contents of this field depend on the type of provider (POP3 or Exchange Web Services) entered in the Email Connector Settings slide-out editor.
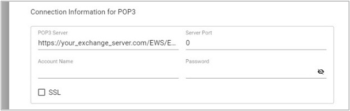
POP3
For POP3 Provider, enter the Server Port, Account Name and Password:
Exchange Web Services (EWS)
If Exchange Web Services is the provider, Email Connector can be set to either Basic or OAuth 2.0 as the Authentication type to retrieve and process emails.
Note : If OAuth 2.0 is set as the Authentication type, make sure OAuth configuration is set up via the ChangeGear Desktop Client > Administration > Global Settings
EWS Connection can be tested by clicking on Test.
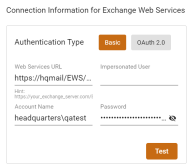
Exchange Web Services (EWS) Basic
For EWS Basic Authentication type, enter the URL, account name, and password:
Exchange Web Services (EWS) OAuth 2.0
For OAuth 2.0 Authentication type, enter the Impersonated User:
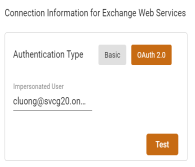
Note: Impersonated User is the email address of the mailbox EWS uses to process emails.
- Ticket creation settings is the type of ticket ChangeGear creates when it processes an email with this instance of Email Connector.
Setting Advanced Options
The Advanced tab contains the email connector's field mappings, where you can configure the field mappings for any module. To help, ChangeGear provides the following default module mapping.
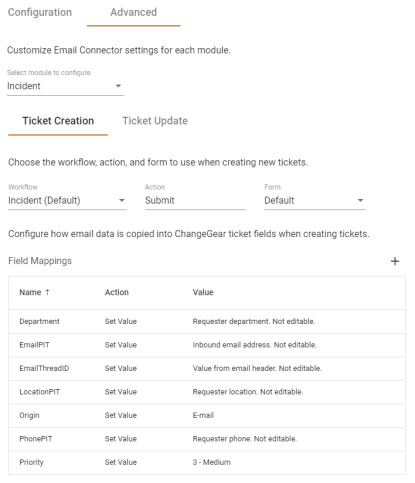
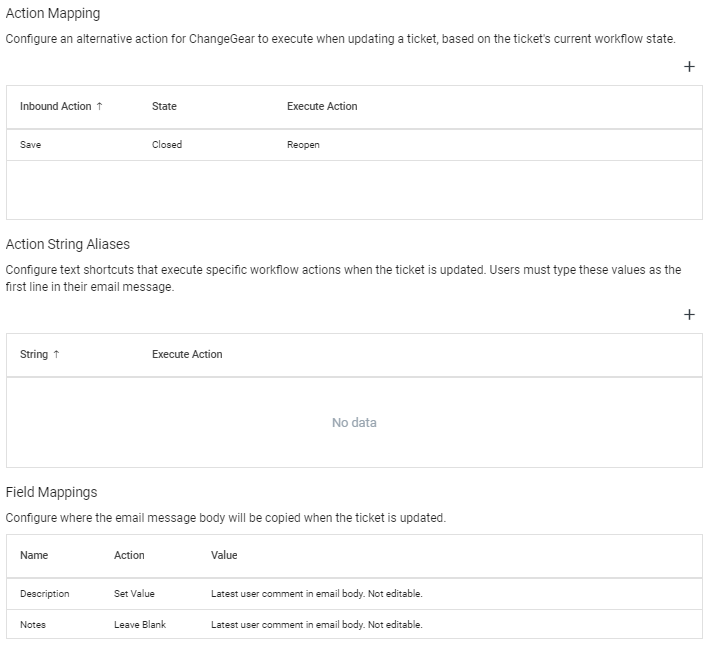
There are two tabs in each module mapping: the Ticket Creation andTicket Update. The Ticket Creation tab has three input fields (Workflow,Actions,Form) at the top, with a field mappings grid at the bottom. You cannot delete the default Field Mappings in the grid. You can edit the Field Mappings in the grid by clicking the pencil icon. Once in edit mode for the Field Mappings you can change the actions from Set Value to Leave Blank. Some fields in the grid can be lookup lists, for example thePriority field--you can change its value from a drop-down. The Field Mappings grid also supports custom Field Mappings. By clicking the + button at the top of the grid and filling in the required fields you can create a custom Field Mapping.
The Ticket Update tab has three grids with a description for each grid.