Using Conversations
The Conversation feature lets you review correspondence with other users from a single location on a ticket. It merges multiple channels of communication into a single control, allowing you to send and receive correspondence using e-mail from the ticket form itself. Updates captured via e-mail are displayed as inbound correspondence, while updates sent to from the control are displayed as outbound correspondence. The result is a comprehensive view of all communications surrounding the ticket displayed in a conversational format.
Note: This functionality must be configured before use. Please contact your IT department or ChangeGear administrator for more information.
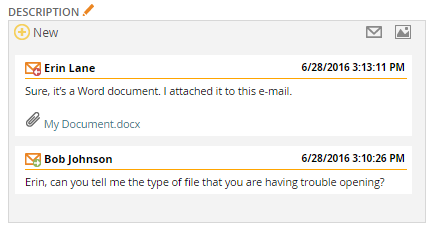
The conversation layout is similar to that of a chat window. Outgoing correspondence appears left-justified, while incoming correspondence appears indented. Each message displays the following information:
-
The communication channel. ChangeGear displays the
 icon for incoming e-mails
and the
icon for incoming e-mails
and the  icon for outgoing e-mails.
 -
The name of the user who submitted the message.
-
The date and time that ChangeGear processed the message.
-
The body of the message.
-
Any attachments, if applicable.
ChangeGear also records each message in the ticket's history. Outgoing correspondence is recorded with the Send action. Viewing the action displays the contents of the message, the recipient of the message, and the subject of the message. Incoming correspondence is recorded with the Save action.
Note: The control does not automatically display new messages as they arrive. To refresh the message list, close and reopen the ticket window.
Sending Correspondence from a Ticket
With Conversations, you can e-mail the ticket requester directly from the ticket form. The e-mail will appear to originate from ChangeGear, but it will contain any message that you choose to provide to the requester. It will also contain the summary of the ticket and the ticket number.
To send outbound correspondence:
-
Create a new ticket
- OR -
Open an existing ticket.
-
Click the
 button to open the e-mail popup.
 -
Enter the e-mail's subject in the Subject field.
-
Optionally, specify the e-mail's recipients in the Recipients field. You can add multiple recipients by separating each e-mail address with a semicolon.
-
Enter a message for the recipient in the Message field.
-
Click OK.