Mapping Fields
After you have set up an integration source and project mapping, you can begin mapping ChangeGear fields to fields in the project.
To map fields between ChangeGear and a project:
-
Open an existing integration source from the General > Integration Sources lookup list.
-
Select a project mapping from the grid.
-
Click Mappings to open the field mappings dialog.
-
By default, the Available Mappings field displays Create a new mapping.... If this is not the case, select Create a new mapping.. from the drop down list.
-
Enter a name for the mapping in the Mapping name field.
Important: Please choose a name other than Default.
-
In the Direction field, select the direction that changes should propagate in when ChangeGear synchronizes with the integration source.
-
Outbound: ChangeGear relays changes to the integration source, but will not receive changes.
-
Inbound: ChangeGear receives changes from the integration source, but does not send them.
-
Bi-directional: ChangeGear both sends and receives changes.
-
In the Attachments field, select whether to sync attachments between tickets. Select All to sync all attachments, or select None to prevent syncing attachments.
-
Optionally, click Default to specify this mapping as the fallback for fields that cannot be mapped (or for mappings that are not defined).
-
Specify your field mappings. The ChangeGear Fields list displays the fields available in the ChangeGear module, while the External Fields list displays the fields available in the integration source. Required fields are indicated in bold text.
-
To create a mapping between a ChangeGear field and an external field, select a field from the ChangeGear Fields list, select a field from the External fields list, then click Link. This creates a mapping and displays it in the Linked Fields list. The following image shows a mapping between the Summary field in ChangeGear project and the Summary field in a JIRA project:
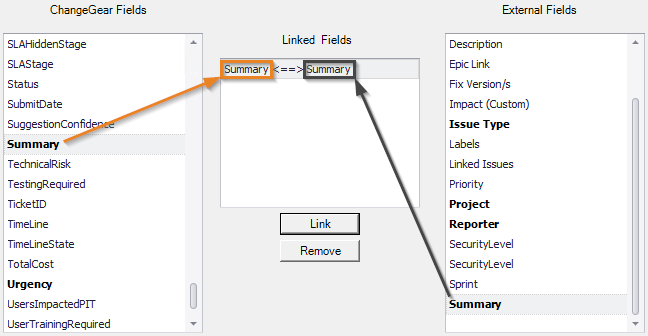
Tip: Right-click the External Fields list box to toggle between "pretty" (user interface) field names and "full" (internal) field names.
-
If the mapping is between two lookup lists, the Allowed Values Pairing dialog displays. This window lets you map a lookup list value in the ChangeGear field to a lookup list value in the external field. You can link values the same way you link fields. Additionally, you can specify a default link, which acts as a fallback for fields that cannot be mapped. The following image shows a mapping between the Priority field in the Incident module and the Priority field in a JIRA project. Note that there is no mapping for JIRA's Lowest field, so any JIRA tickets with a Priority of Lowest will result in a ChangeGear ticket with a default Priority of Low.
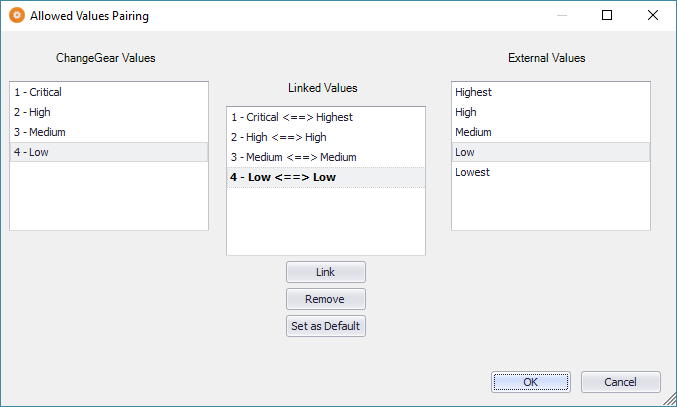
Tip: To re-open the Allowed Values Pairing dialog, double-click on the mapping in the Linked Fields list.
-
To remove a mapping, select the mapping in the Linked Fields list and click Remove.
-
Click OK to save your changes.
Now that you have created field mappings, you will need to create an automation that triggers a synchronization between the ChangeGear and the integration source. You can accomplish this by adding an automation to a Workflow or to a BPA. For more information, see Synchronizing with Integration Sources.