Import Jobs
The Data Jobs (also referred to as Import Jobs) feature enables users to create and schedule data imports into ChangeGear. You can use this feature to bring in external data—such as tickets, assets, or people—and monitor job progress, performance, and history.
You can access Import Jobs by navigating to Design Studio > All Apps > Data Jobs or from within a specific app (i.e. Design Studio > Change > Data Jobs).
Click a topic below to navigate to that specific section.
Creating and Managing Import Jobs
Here is the process for creating and managing import jobs. The import job workflow allows you to either generate the Excel template first or define the job first before uploading your completed data file.
Figure 1: Import Job Overview

Use the steps below to define and run import jobs.
Create a New Import Job:
-
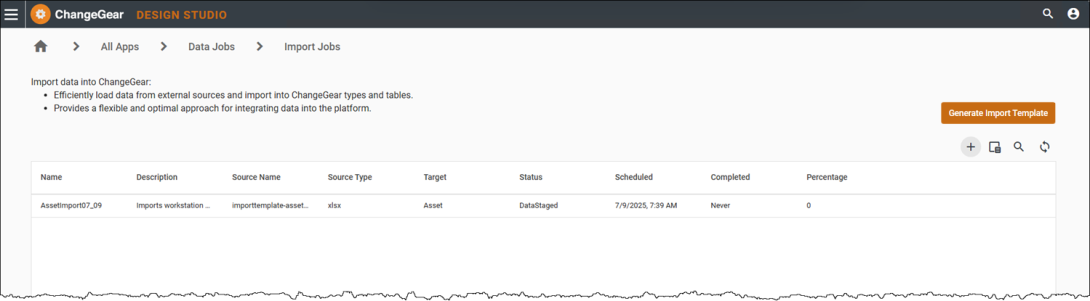
In Design Studio, go to All Apps(or to a specific app) > Data Jobs > Import Jobs.
Figure 2: Create Import Job Screen
-
Click the + (plus) icon to open the New Import Job form.
-
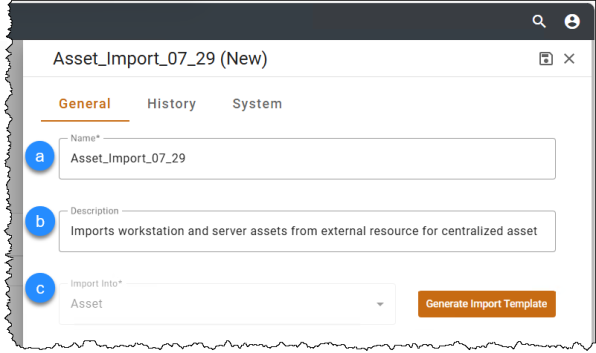
Fill in the following:
-
Name: Enter a unique job name.
Note: Job names must be compatible with SQL table naming standards.
-
Provide a Description to explain the purpose of the job (e.g., Asset sync or weekly user load).
-
Select a Target Module (e.g., Incident, Asset, Person) from the dropdown.
Note: This is auto-populated if you're creating an import job from within a specific app or module.
Figure 3: New Import Job Form
-
-
Click Save
 .
.
Prepare the Import File:
To import data into ChangeGear, you must use a structured Excel template. This template is generated and includes the correct column headers and formats. The Excel template ensures your data is structured correctly so ChangeGear can process and import maintaining data integrity. It includes the right column names and formats to help avoid import errors.
You can choose one of the following to prepare your data:
-
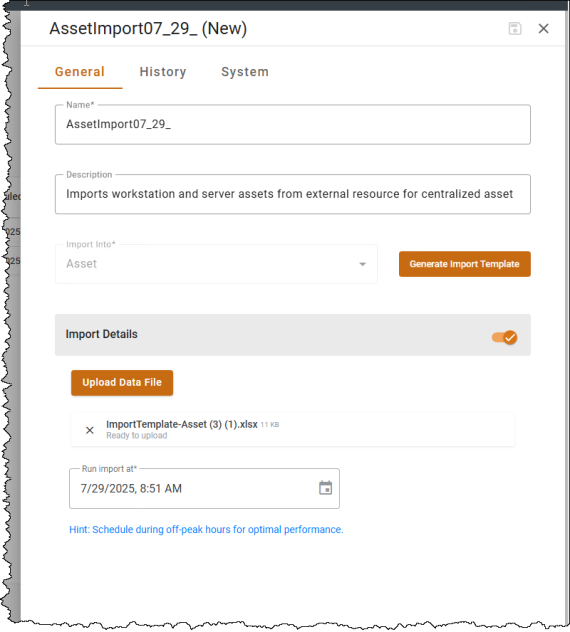
If you already have an Excel file that follows the required structure (including correct column names and format), click Upload Data File and select your file.
-
Click Generate Import Template if you need a fresh file structured with the correct schema and column headers. See Import Templates for additional help with downloading the template and filling in the data.
Note: When you upload a file, ChangeGear does not directly import the data into your database. Instead, it uses staging tables to validate and process records. See Staging and Duplication.
Enable and Schedule the Job:
-
Once you upload the data file, select the toggle to enable the job. Scheduling is only available on enabled jobs.
-
Click Schedule
 , then set the Start Date and Time.
Hint: It is recommended to schedule imports during off-peak hours.
-
Click Save to commit your changes and schedule the import.
Figure 4: Completed Import Job Form
Staging and Deduplication
When you upload a file, ChangeGear uses staging tables to validate and process the records. With staging and deduplication built-in, you can process both new and updated records from external sources.
Staging Table Behavior
-
Uploaded rows are first saved into a temporary table
-
Validates required fields and data types
-
Matches lookup values (e.g., Vendor Name, Asset Type)
-
Prevents corrupt or incomplete records from reaching production
Deduplication Logic (Asset and CMDB Only)
ChangeGear supports two methods of deduplication when importing Asset and CMDB records. The behavior depends on the Match Records using Import Duplicate Behavior setting in Data Job Management.
-
If the toggle is turned ON (default):
ChangeGear applies the built-in deduplication logic for Asset and CMDB. It identifies duplicates using backend matching rules (such as asset tag, serial number, etc.)—regardless of the Unique Identifier set in the template.
-
If a matching record exists, it is updated
-
If no match is found, a new record is created
-
If multiple matches exist, the record is flagged and skipped during validation
-
-
If the toggle is turned OFF:
ChangeGear uses only the Unique Identifier specified in the import template to find matches.
-
If a match is found, it is updated
-
If no match is found, a new record is created
-
If multiple matches exist, the record is flagged and skipped
Note: This setting applies only to Asset and CMDB data jobs. Other modules (e.g., Incident, Change) rely solely on the Unique Identifier defined in the import file.
-
You can monitor job status from the Import Job History tab.
Viewing Import Job History
After an import job is created, it is tracked in Import Job History. This section allows administrators to verify job creation, monitor status, and review informational messages associated with each job.
You can access this screen by navigating to Design Studio > All Apps > Data Jobs > Import Job History or from within a specific app (i.e. Design Studio > Change > Data Jobs > Import Job History).
Figure 5: Import Job History Screen
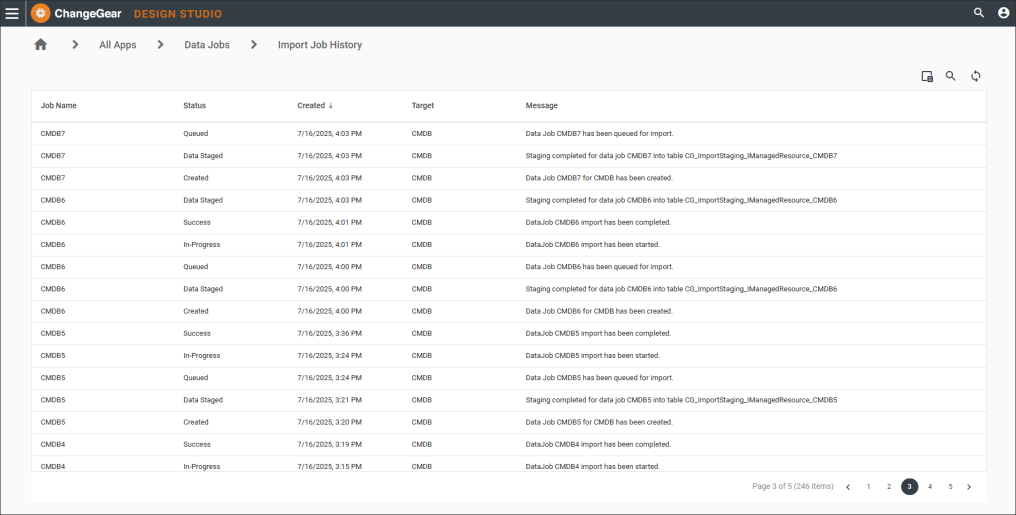
Each job entry in the Import Job History table includes the following.
|
Column |
Description |
|
Job Name |
The name of the import job as defined during creation. |
|
Status |
The current state of the job. Status include: Created, Queued, In Progress, Data Staged, Success, and Failure. |
|
Created |
The date the job was created in the system. |
|
Target |
The ChangeGear module into which data is being imported (e.g., Asset, CMDB). |
|
Message |
System-generated updates that provide details on the job’s progress or completion (e.g., staging complete, job started, import completed). |
The Status column in the Import Job History table shows the current state of each job. These are the possible statuses and what they mean.
|
Status |
Description |
|
New |
The job has been created but not yet processed. |
|
Data Staged |
Data has been validated and staged and ready for import. |
|
In-Progress |
The import job is currently running. |
|
Success |
The import completed successfully without errors. |
|
Failure |
The import encountered an error and did not complete. |
|
File Not Found |
The specified Excel file could not be located or accessed. |
|
File Uploaded |
The file has successfully uploaded. |
|
Updated |
The file is updated. |
|
Queued |
The job is waiting in line to be processed. |
|
Created |
The job has been successfully defined and saved. |
|
Import Completed with Errors |
The import finished, but one or more records failed to process correctly. The error file can be downloaded from within the data job or can be emailed if notifications are set up. |
For help diagnosing import errors, see Troubleshooting Import Errors.
Data Job Settings
This section lets you define import behaviors across all jobs. These global import settings allow administrators to control how data is processed during Excel-based imports—such as suppressing noise from notifications or fine-tuning duplicate record handling. Settings here apply to all import jobs created in ChangeGear.
Figure 6: Data Jobs Settings Screen
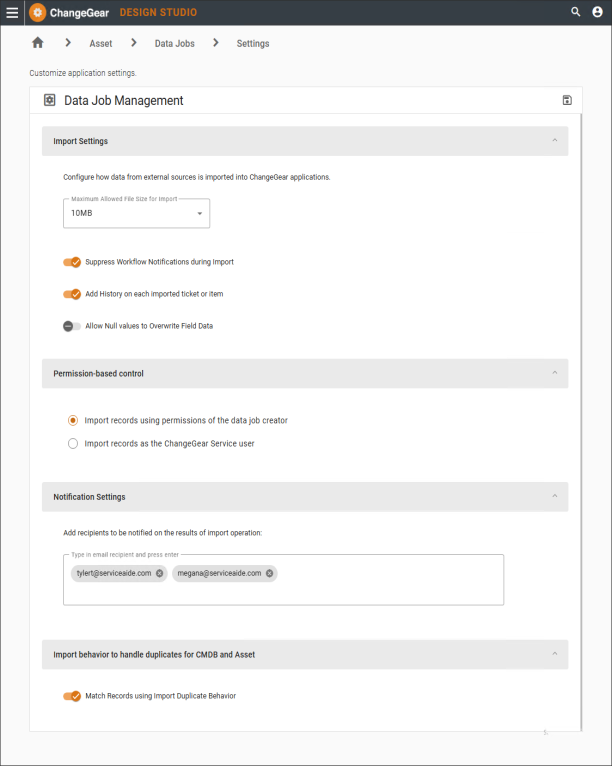
Import Settings
|
Option |
Purpose |
|
Maximum Allowed File Size |
Prevents uploads of excessively large spreadsheets. Default file size limit is 10 MB. You can increase the limit to 20 MB or 25 MB using this setting. |
|
Suppress Workflow Notifications during Import |
This setting is enabled by default and prevents triggering of notifications during import. This is useful for minimizing noiseduring large asset or ticket imports. |
|
Add History on each imported ticket or item |
Adds history entry to imported tickets. Use "Add History" so imported records can be traced, but suppress workflows to avoid unintentional alerts. |
|
Allow Null values to Overwrite Field Data |
When this setting is enabled, blank or NULL values in the import file will overwrite existing values in the record. When disabled, blank or NULL values are ignored, and existing values remain unchanged. Example—If an import file leaves the Description column blank:
|
Permission Based Control
|
Option |
Purpose |
|
Import records using permissions of the data job creator |
Applies the permissions of the user who created the import job. The system checks whether this user has the required rights to perform operations defined by the job—such as create, update, or action-based operations (e.g., close, resolve). Permissions are managed in the Web Admin module under Roles. |
|
Import records as the ChangeGear Service user |
Applies the elevated permissions of the system-level CG Service user. Use this when import jobs need to bypass standard user-level restrictions. |
Note: The selected permission setting affects not only basic create/update operations but also action commands included in the import file, such as transitioning status or triggering workflow steps. Ensure the job owner or CG Service user has the required privileges for all intended operations.
Notification Settings
Specify who should be notified when an import job completes. If the import completes with errors, the email will include the failed Excel file as an attachment for review.
|
Field |
Purpose |
|
Email Addresses |
Enter one or more addresses to receive a notification on success/failure of each import. Separate entries with commas or press Enter. |
Import Behavior to handle duplicates for CMDB and Asset
This setting controls how duplicates are matched for Asset and CMDB data.
|
Option |
Purpose |
|
Match Records using Import Duplicate Behavior |
This option is enabled by default. ChangeGear uses the de-duplication logic built into the CMDB and Asset modules to compare incoming records with existing records. If a matching record is found (based on system-managed criteria), the existing record is updated. If no match is found, a new record is created. If this option is disabled, the import instead relies on the Unique Identifier field you selected in your Excel template (such as Asset Tag). In this case, duplicates may occur if the identifier is missing or incorrect. |