Using Import Templates
To import records into ChangeGear, you’ll need to use a structured Excel template. This ensures the system can validate and map your data correctly. This topic walks you through downloading a new template, filling it in, and uploading it successfully.
What Is the Import Template?
The Excel import template is a structured spreadsheet with two tabs:
-
Sheet1: where you enter the data to be imported.
-
Instructions: built-in guidance about key fields, formatting rules, and example associations.
Important: The column headers in Sheet1 reflect the fields you select when generating the template. These headers must not be renamed, reordered, or deleted.
In the following scenario, an IT operations team is importing newly purchased hardware assets—such as laptops, printers, and mobile devices—into ChangeGear’s Asset module from an external purchasing or inventory system (i.e., Lansweeper) to keep their inventory current. Each asset should automatically move into the correct lifecycle state based on predefined workflow actions.
To support this, they generate an Excel template that includes both descriptive fields (like Asset Type or Vendor) and a workflow Action column (like "Order") to trigger specific lifecycle transitions during import, allowing the team to place assets directly into their operational state without manual updates after import.
Note: The Action column is optional. If included, it executes the specified workflow action during import (e.g., Deploy or Order) and set the record's status automatically. For all modules except CMDB (e.g., Incident, Change), you must provide a valid Action (e.g., Submit for Incident, or Order for Asset) to avoid records remaining in an unsubmitted state and the specific action must be reachable from the initial state.
To Generate the Import Template:
-
From the Main Menu
 , go to Administration> Design Studio > Asset > Data Jobs.
 -
Create a new import job or open an existing one.
-
In the Import Job form, click Generate Import Template.
-
In the column selector, check the boxes for the fields to include. Select the following for this scenario:
-
Action - to trigger a workflow (e.g., "Deploy or Order")
-
Asset Tag - used as the unique identifier
-
AssetType (Name)
-
Vendor (Name)
-
-
Use the arrow buttons (›, ») to move your selected fields into the Selected Columns list on the right.
-
Choose at least one non-lookup field to mark as a Unique Identifier column (required) identifier (e.g., Asset Tag).
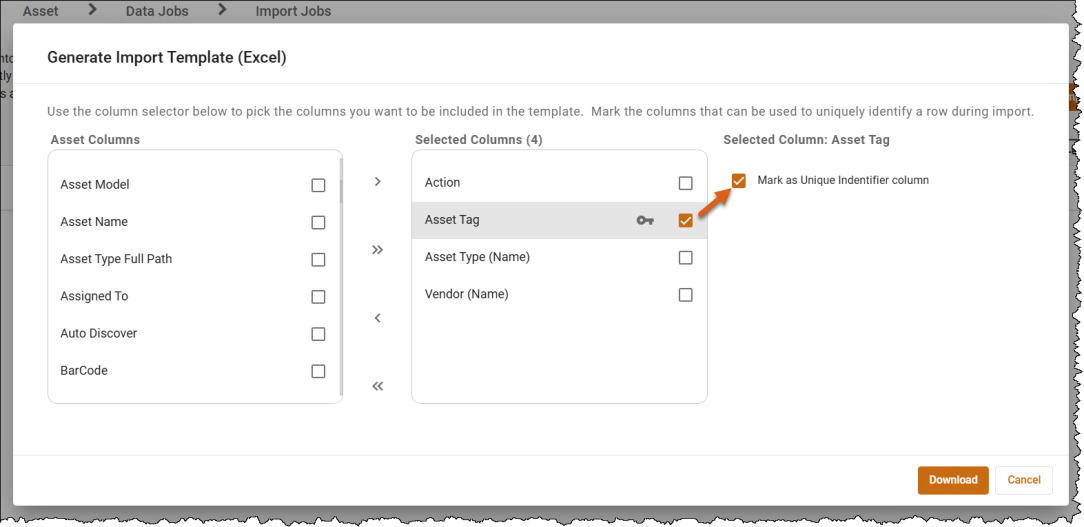
Important: The column you select as the Unique Identifier is used by ChangeGear to apply deduplication logic for Asset and CMDB modules. If a record already exists with this value, it will be updated—otherwise, a new record is created.
-
If deduplication is enabled, ChangeGear uses this value to determine whether to update an existing record or create a new one.
-
If deduplication is disabled (which can be configured in Data Job Settings), this value is ignored during import, and new records are always created, even if duplicates exist.
-
To learn more, see Staging and Deduplication for how import jobs handle validation and record matching.
Note: Lookup fields (like or Vendor) cannot be used as unique identifiers.
-
-
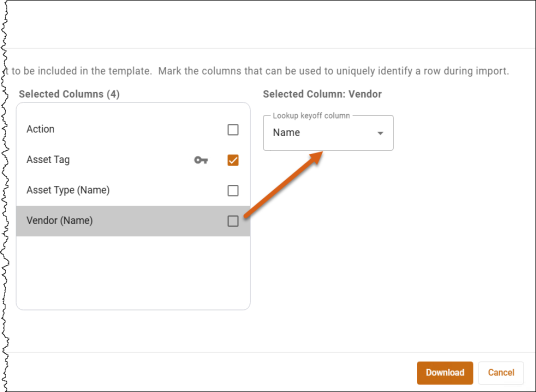
When a lookup field is selected, such as Vendor (Name), you'll be prompted to choose the lookup key used to match it during import. Options available depend on the field selected.
-
-
Click Download to generate the Excel file.
-
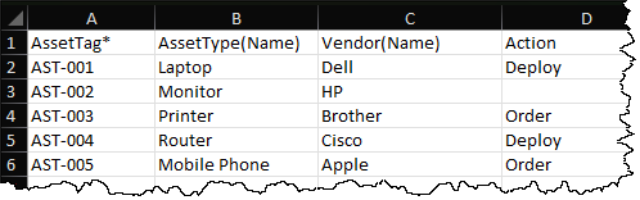
Open the downloaded file. It contains two sheets:
-
Sheet1 – where you will enter your import data using the column headers selected when the template was generated.
Example: Fields for Asset Module
-
Instructions – Data rules providing guidance on field requirements and how to format key and association values.
-
-
On Sheet1, enter your data under the column headers provided. Data entry rules include:
-
Headers must be present and must not be changed.
-
Do not rename, reorder, or delete any column headers.
-
Each row must include values for all required fields.
-
Optional fields can be left blank or explicitly marked as 'NULL'.
-
Lookup fields like Vendor (Name) must match existing records by the selected lookup key (e.g., Name or Address 1).
-
Fields used as keys are marked with an asterisk (*) in the header.
-
Associated fields must include the key field name in parentheses.
-
-
Save the file as .xlsx.
-
Once your data is filled in and saved, return to your Import Job and click Upload, then enable and schedule the job. The file will be validated automatically. You can monitor the results from the Import Job History tab.