Adding Automation to Actions
You can set up and enable workflow automations to run when actions are performed. To add an automation:
-
Identify which actions require automations
-
Know what automations should run and in what order
In this scenario, we are automatically notifying certain recipients that an action has occurred on a ticket. For example, the default behavior of the Submit action is to automatically send an e-mail to all task implementers.
Note: When adding multiple automation steps to an action, the steps are executed in order, i.e., if you have a notification and an edit value automation step and you want the edit value step to be executed first, list the edit value step first.
To add or edit a Notify automation for an existing action:
-
In Design Studio, click All Apps, or navigate to the desired app (i.e. Change), then select Workflows. All workflows are displayed.
-
Select an existing workflow to modify. You can either create a copy of the workflow or open the workflow in Design Mode, then save it as a new workflow. If saving as a new workflow, name the workflow and click OK.
-
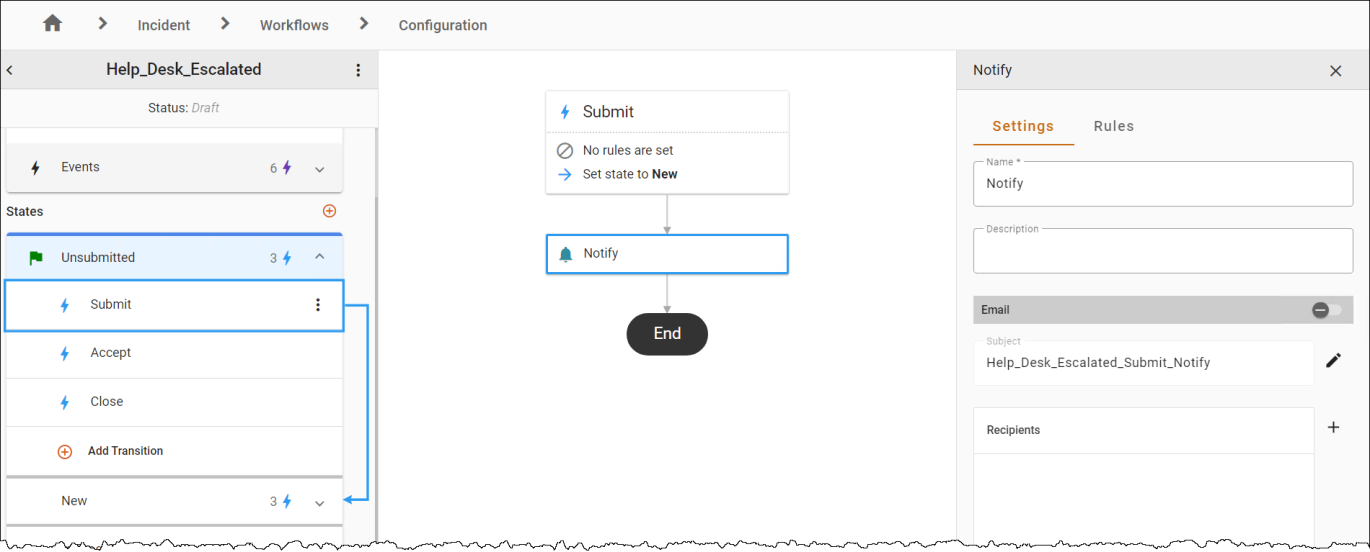
In the Left Panel under States, click a state to view available transitions, then select a transition to view the corresponding action, the list of automations to be executed (displayed in the action flow designer) and the action properties in the right panel.
-
To add an automation, hover over a transition line below the Action to view and click the
 icon. For this example, select the Notify action in the Select automation... drop-down. The Automation Properties Panel displays.
 -
To edit an existing automation, select the action and click within the automation. The Automation Properties Panel displays.
-
In the Settings tab.
-
Modify the Name and Description fields as necessary.
-
Under Email and/or SMS, select the toggle to enable/disable the communication template. Click the Pencil Icon
 if you wish to modify the communication template.
 -
To add recipients, click the
 button and double-click a recipient, or select a recipient and click Add. You can select recipients from the Users, Teams, Roles, Dynamic Roles, or Contacts tabs.
 -
Click
 to Save.
-
-
In the Rules tab, use the Criteria Builder to add conditions to the automation.
-
Click the three-dot menu to Save or Publish the workflow.
To create a new action and add a Notify automation:
-
In Design Studio, click All Apps, or navigate to the desired app (i.e. Change), then select Workflows.
-
Select an existing workflow to modify. You can either create a copy of the workflow or open the workflow in Design Mode, then save it as a new workflow. If saving as a new workflow, name the workflow and click OK.
-
In the Left Panel under States, click a state to view available transitions, then click the Add Transition
button. -
Select an end state from the To drop-down, select a Name, then click OK.
-
In the action flow designer, hover over the connecting line below the Action to view and click the
icon. A new Automation selector displays. -
In the drop-down, select the Notify (formerly referred to as Notify via Email) automation option.
-
Click the three-dot menu to Save or Publish the workflow.
To remove an automation from an action:
-
In Design Studio, click All Apps, or navigate to the desired app (i.e. Change), then select Workflows.
-
Open a workflow. In the Left Panel under States, select an action to view the Properties Panel.
-
Click the
 within the Action card to delete the automaton.
 -
To finalize the change, click the three-dot menu to Save or Publish the workflow.