Dynamic Form Request
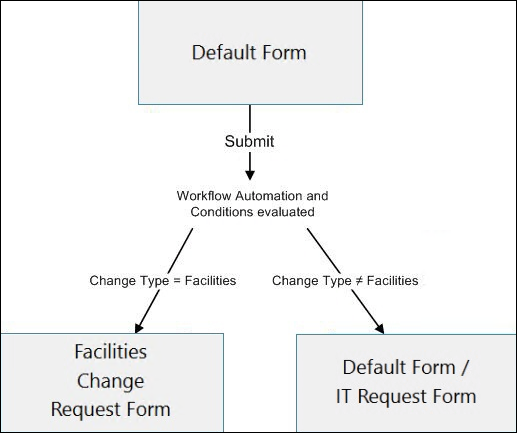
An alternative to posting a link with a non-default form is to provide a method to select a type, (or a different selection), on a default form so that, upon submission, the ticket displays a customized form. In this example, we automatically switch forms when a ticket is submitted so tickets requesting changes to the facilities will display a separate form after the ticket has been submitted. This switch is accomplished by adding a condition to the Submit action that evaluates the Root Change Type of the submitted ticket and determines, based on the condition, which form should display based on the Change Type.
Note:
This method displays the default RFC form before submitting. If you do not want your users to view this form for their particular request, you can provide specific links on your internal service requests pages to open different forms, e.g., http://www.yourserver/cgweb/MainUI/ServiceDesk/SDItemEditPanel.aspx?boundtable=IIncidentRequest&LayoutName=X where the bold items are replaced with their respective names.
The customized form should not be active.
The EditorLayout field does not need to be on the customized form.
To switch forms automatically:
-
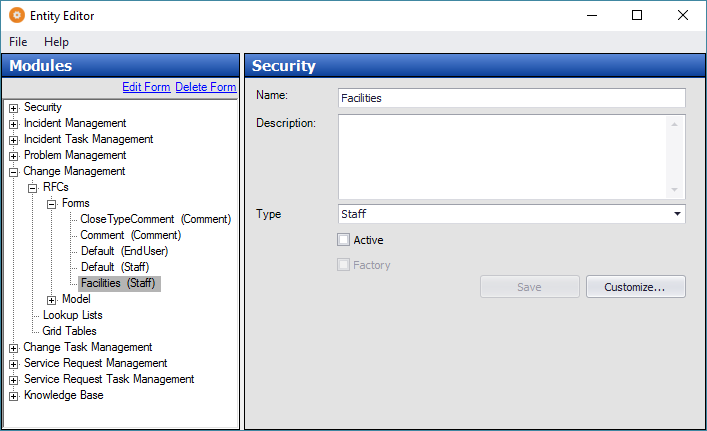
In the DT Client, create a new form by opening an existing form, modifying the layout of the form, and saving the form with a new name. In this example, we are creating a new Change Management form called "Facilities". Note that the form is not active.
-
In ChangeGear Web, click the Administration tab.
-
Under the Platform node, click Design Studio. This takes you to the Design Studio Home Screen.
-
Modify a Change workflow. You can either create a copy of the workflow or double-click the row to open the workflow in Design Mode, then save it as a new workflow. If saving as a new workflow, name the workflow and click OK. For more information on creating workflows, see the topic,Workflow Designer. Be sure to enable the workflow after creating it.
-
For this scenario, select the Unsubmitted state, then select the Submit transition. The main content area displays.
-
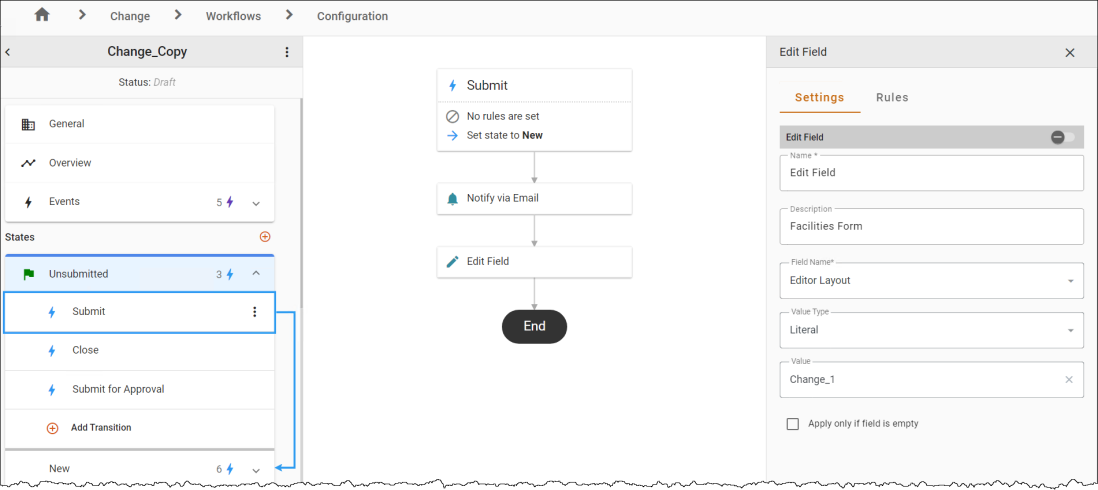
Create a new Edit Field automation.
-
Hover over a transition line below the action to view and click the
 icon. Select the Edit Field action in the Select automation... drop-down. The Automation Properties Panel displays.
 -
In the Settings tab:
-
In the Name field, enter a name for the automation i.e., Facilities.
-
In the Description field, type a description.
-
In the Field Name drop-down, select Editor Layout. This will determine which values can be entered in the Value field.
-
In the Value Type field, ensure Literal is selected for the comparison type.
-
In the Value field, enter the name of the new form you created. We used "Facilities" for this example.
-
Enable the toggle next to Edit Field.
-
-
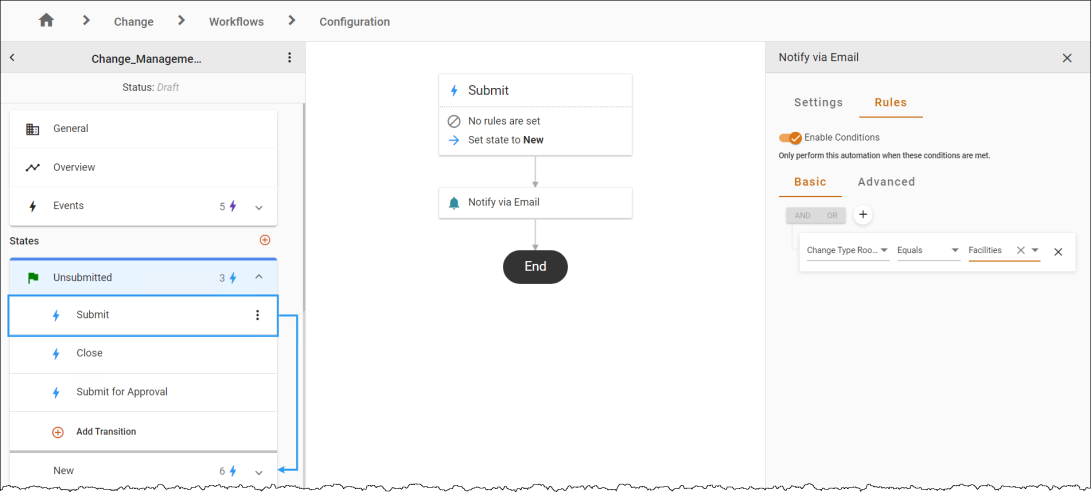
In the Rules tab, create a rule that only triggers the action when the Change Type Root Name equals Facilities.
-
Select the Enable Conditions option to "Always perform this automation when this action is performed."
-
Click the
 , then select Add Condition.
 -
Choose the Change Type Root Name field, then select Equals and Facilities.
-
Select the toggle to Enable Conditions.
-
Click the three-dot menu toPublish the workflow, then set the new workflow as the Default workflow.
-
-
To check that the form switches automatically:
-
Go to ChangeGear Web and create a new RFC. The active RFC form displays.
-
Select Facilities in the Change Type field.
-
Click Submit. The facilities form displays.