Creating a New Approval State
When creating a new approval state, you should know:
-
the state name
-
the state the ticket transitions to on Approval
-
the state the ticket transitions to on Rejection
Note: If you wish to transition the ticket to a state that does not exist in the workflow, you should first create that state. See Creating a New State for more information.
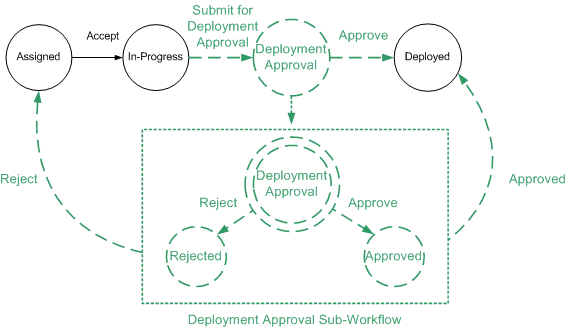
In this scenario, we are creating a new approval state called "Deployment Approval" that is available from the In-Progress state. The Approve action moves the ticket to the Deployed state (created in Creating a New State), while the Reject action moves the ticket to the Assigned state.
Note: Creating a specific approval group is a recommended practice when creating new approval states. See Creating and Editing Approval Groups for more information.
To create a new approval state:
-
In Design Studio, click All Apps, or navigate to the desired app (i.e. Change), then select Workflows component. A grid displays all workflows.
-
Select an existing workflow to modify. You can either create a copy of the workflow or double-click the row to open the workflow in Design Mode, then save it as a new workflow. If saving as a new workflow, name the workflow and click OK.
-
To the right of States, click the + to Add State. The Main Content Area displays the new state properties, including a generated name, and the Type of state set to "Process" by default.
-
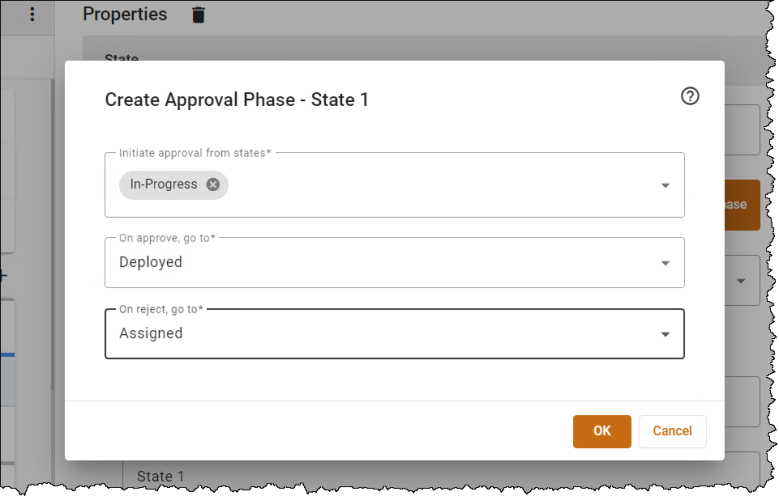
In the drop-down for Type, select Approval. The Create Approval Phasedialog displays.
-
For the Initiate approval from states field, select In-Progress.
Note: Multiple entry points can be chosen.
-
In the On approve, go to drop-down and select Deployed for the outbound state when a ticket is approved. The Deployed state was created in Creating a New State.
-
In the On reject, go to drop-down and select Assigned for the outbound state when a ticket is rejected.
-
Click OK.
-
Within the State panel:
-
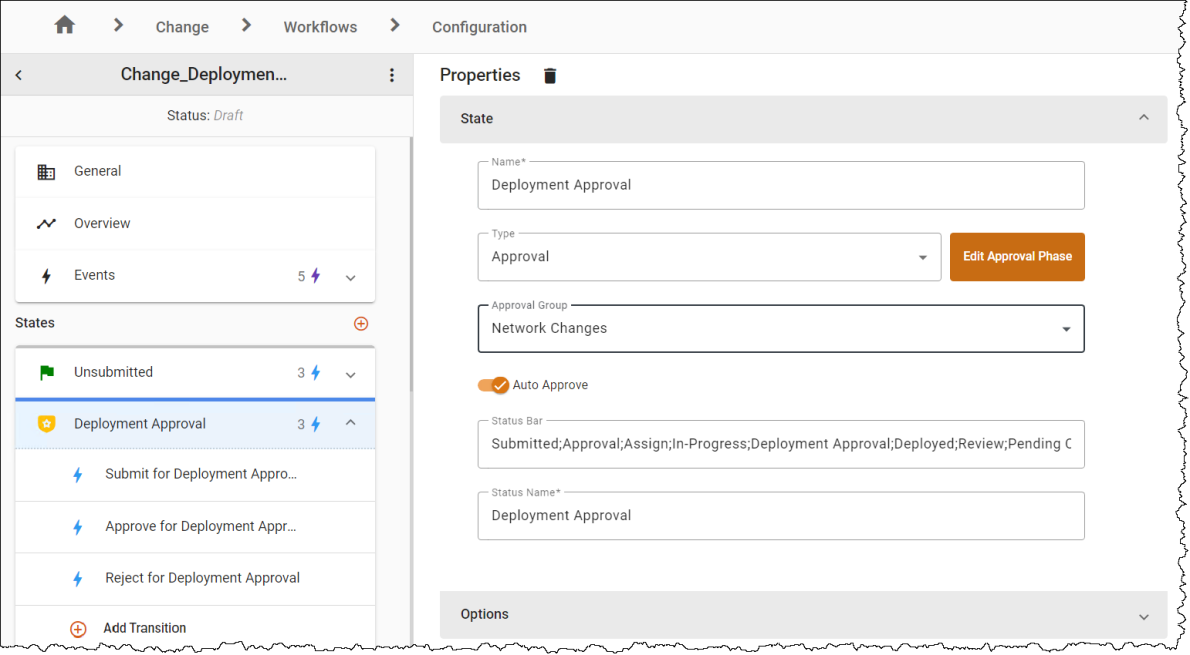
Enter "Deployment Approval" for Name.
-
Edit the Status Bar to read: Submitted;Approval;Assign;In-Progress; Deployment Approval;Deployed;Review;Pending Close;Closed
-
Check that the state name is entered in the Workflow Status Name.
-
If necessary or desired, modify the behavior of the approval state.
-
Disable the Auto Approve toggle if you do not want the ticket to automatically transition to the outbound state when no approvers or approval groups are selected. Also disable the toggle if you do not wish to automatically register your approval when you are the user who moves the ticket into the new approval state.
-
Enter an Approval Group if you want to specify which approval group to use.
Note: This group must have the proper state set in the approval group. If it does not have the state set in the approval group, the ticket will behave as if there is no approval group.
-
-
-
Click the three-dot menu next to the workflow name
 , then Publish the workflow.
 -
Set the workflow as the default to see your changes.
Note: ChangeGear automatically registers the approve action for all tickets submitted by an approver. If you wish to change this behavior, disable the Auto Approve toggle.
Tip: To see your changes, create a new ticket.
See also: