Port Management
The Advanced Settings Port tab serves two purposes: The first is to discover and type network software. The second purpose is to determine which ports are examined for device discovery.
Network Software Discovery
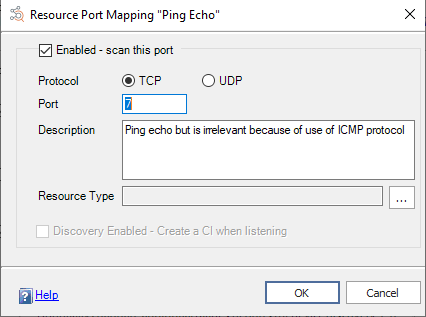
The upper portion of the port tab is used to associate a network software type with a port number. When a port is found to be open and both the resource type and the port is enabled, then a new CI is created if discovery is enabled on the port.

Note: A port can only be mapped to one resource type. For example, if you use ports 80 and 443 for Web services, you would have two entries for Web services.
To add a new port:
-
Open the Port Manager by clicking Advanced... on the Discovery Settings page and navigating to the Port tab.
-
Click New. The Resource Port Mapping dialog displays.
-
Choose which protocol will be used to scan the port.
-
Enter the port number.
-
Enter a description of the port.
-
Select the ... button.
-
Navigate through the resource types and select the resource types that is associated with the port.
-
Click OK to select the resource type.
-
Select Discovery Enabled - Create a CI when listeningif you want to automatically create a CI when the port is found open and both resource type and port are enabled.
-
Click OK to add the port to the list.
To edit a port:
-
Open the Port Manager by clicking Advanced... on the Discovery Settings page and navigating to the Port tab.
-
Double-click the entry you wish to edit
- OR -
Select the entry you wish to edit and click Properties. The Resource Port Mapping dialog displays.
-
Enter your changes.
-
Click OK.
To delete a port:
-
Open the Port Manager by clicking Advanced... on the Discovery Settings page and navigating to the Port tab.
-
Select the port you wish to delete.
-
Click Delete.
To enable/disable a port:
-
Open the Port Manager by clicking Advanced... on the Discovery Settings page and navigating to the Port tab.
-
Select the checkbox by the ports you wish to discover. Clear the checkbox by the ports you do not wish to discover.
-
Click OK.
Device Discovery
The top portion of the Port tab controls which ports are used to discover devices using either TCP or UDP. If a port responds, a device is assumed to exist.
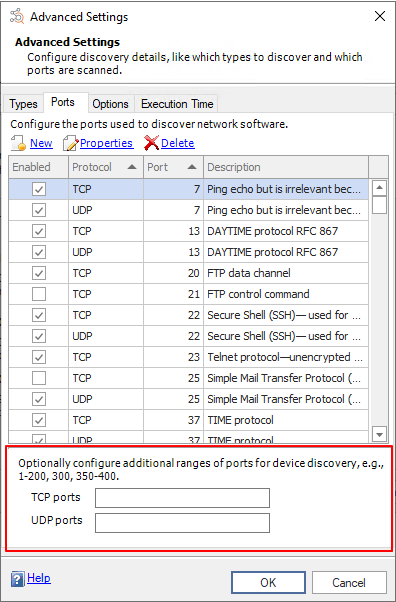
To check for devices attached to a port:
-
Open the Port Manager by clicking Advanced... on the Discovery Settings page and navigating to the Port tab.
-
Enter the ports you wish to scan using TCP in the TCP ports field.
-
Enter the ports you wish to scan using UDP in the UDP ports field.
-
Click OK.
Note: You can enter ranges and add specific ports so long as each entry is separated by a comma, e.g., 1-200,1494,3389.
See also:
Advanced Discovery Settings
Resource Type Management
Discovery and Scanning Options
Execution Time