Configuring Multiple Workflows
ChangeGear supports the use of multiple independent workflows. Each module can have one or more workflows that can be assigned to a ticket created within that module. You can also set notification rules and role-specific privileges independently for each workflow.
IMPORTANT: All modules support configuring multiple workflows. Examples of configuring multiple workflows is shown below for the Incident and Change modules. For more information, please see the Configuring Multiple Workflows section below.
There are many ways to assign a workflow to a ticket. In the following example, we use a workflow automation to change an incident ticket's workflow based on the incident type. We use an Edit Field automation to change the workflow from the default to a workflow that we created. We first create the new workflow that we want to assign to the ticket. We then create a new workflow with The Edit Field automation that changes the workflow based on the incident type.
To automatically assign a workflow to a ticket:
-
In the ChangeGear Desktop (DT) Client, open the Administration module.
-
Open the Entity Editor and set the Workflow field to be visible for the desired module.
-
Navigate to Advanced, then click the Entity Editor.
-
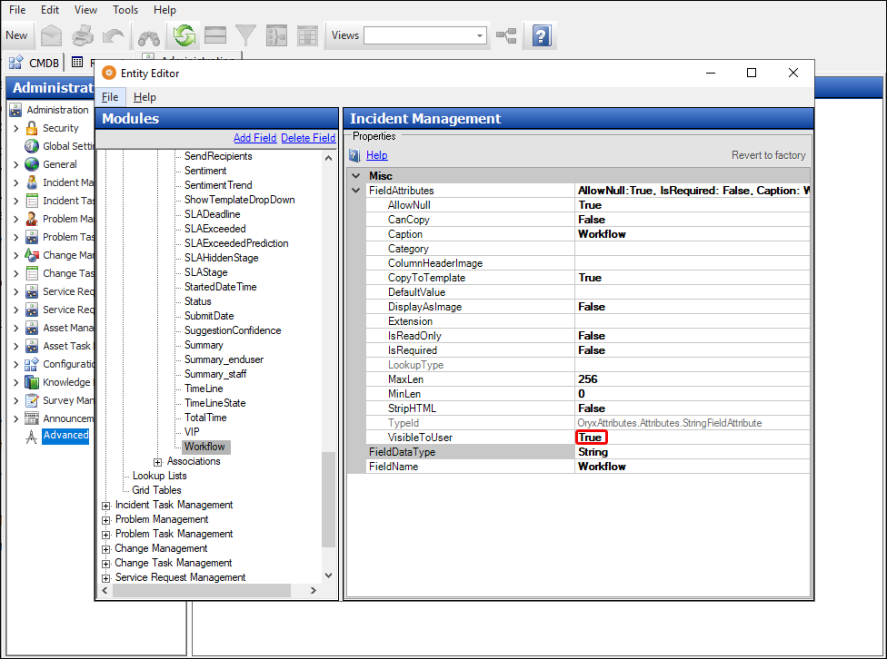
In the Entity Editor, navigate to Incident Management > Incident Request > Model > Fields and click on Workflow.
-
Change the value of the VisibleToUser field to True.
-
Click File > Save All Changes to save the model, then close the Entity Editor.
-
-
In ChangeGear Web, click the Administration tab.
-
Under the Platform node, click Design Studio. This takes you to the Design Studio Home Screen.
-
In Design Studio, click All Apps, or navigate to the desired app (i.e. Incident), then select Workflows. A grid displays all workflows.
-
To create the workflow that will be assigned to the ticket, select an existing workflow to modify. You can either create a copy of the workflow or double-click the row to open the workflow in Design Mode, then save it as a new workflow. If saving as a new workflow, name the workflow and click OK. For more information on creating workflows, see the topic, Workflow Designer. Be sure to enable the workflow after creating it.
-
Configure any privileges that you wish to use for the workflow. For more information on configuring workflow privileges, see Defining Role Privileges.
Warning: Always configure a workflow's privileges before assigning it to a ticket. Serviceaide recommends configuring privileges immediately after enabling a new workflow.
-
Click the three-dot menu next to the workflow name
 , then Publish the workflow.
 -
Open the default workflow and add a new automation that changes the workflow based on the Incident Type field. For more information on adding automations, see Adding Automation to Actions.
-
In the Left Panel under States, click a state to view available transitions, then select a transition to view the corresponding action, the list of automations to be executed (displayed in the action flow designer) and the action properties in the right panel. This example uses Submit.
-
Create a new Edit Field automation by hovering over a transition line below the action to view and click the
 icon. Select the Edit Field action in the Select automation... drop-down. The Automation Properties Panel displays.
 -
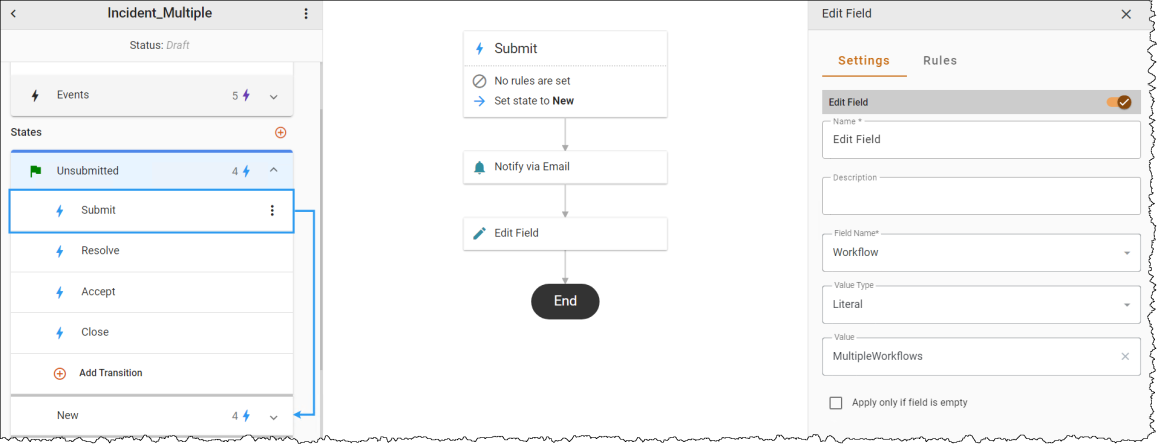
For this scenario, select the Unsubmitted state, then select the Submit transition. The main content area displays.
-
In the Settings tab.
-
In the Name field, enter a name for the automation.
-
In the Description field, type a description of the automation.
-
In the Field Name field, enter Workflow. This will determine which values can be entered in the Value Type field.
-
In the Value Type field, ensure Literal is selected for the comparison type.
-
In the Value field, enter the name of the workflow you created in step 6.
-
After you configure your desired settings, select the toggle next to Edit Field to enable the automation.
-
-
In the Rules tab, create a rule that only triggers the action when the Incident Type is equal to 1 -Failure. For more information on adding conditions, see Adding Conditions to Automation.
-
Select the Enable Conditions option to "Always perform this automation when this action is performed."
-
Select + Add Condition.
-
In the Choose a field drop-down, select Incident Type Root Name.
-
In the Choose an operator drop-down, select 1 - Failure.
-
-
-
Click the three-dot menu to Publish the workflow, then set the new workflow as the Default workflow.
Log in to the ChangeGear Web client as a staff user and create a new incident ticket. Select "1 - Failure" for the Incident Type field and submit the ticket. The ticket now uses your customized workflow instead of the default workflow.
Configuring Multiple Workflows for the Change Module
In the Change module, staff users can determine which workflow a ticket will use based on a selection from a drop-down. When a user creates a new change request, he or she selects a process type from a field on the form. Each process type can have a corresponding workflow. Once the ticket is saved, it immediately enters the workflow associated with the selected process type.
Process types can be configured to use a specific workflow as long as that workflow is enabled. If the user does not choose a process type, then the default workflow is used.
IMPORTANT: The default workflow must be set to the Change_Mode, Standard_FastTrack, or Emergency workflows, or to a custom workflow that was created using one of these three workflows. If none of these workflows are set, then the ticket will always use the default workflow.
To configure multiple workflows for the Change module:
-
In ChangeGear Web, click the Administration tab.
-
Under the Platform node, click Design Studio. This takes you to the Design Studio Home Screen.
-
In Design Studio, click Change, then select Workflows. A grid displays all workflows.
-
Configure the workflows that you wish to use for your change requests. Enable the workflows that you wish to have available and set the fallback workflow as the Default workflow. For more information on enabling workflows, see Managing Workflows.
-
Navigate back to the Change app/module by clicking the Change option from within the breadcrumb menu.
-
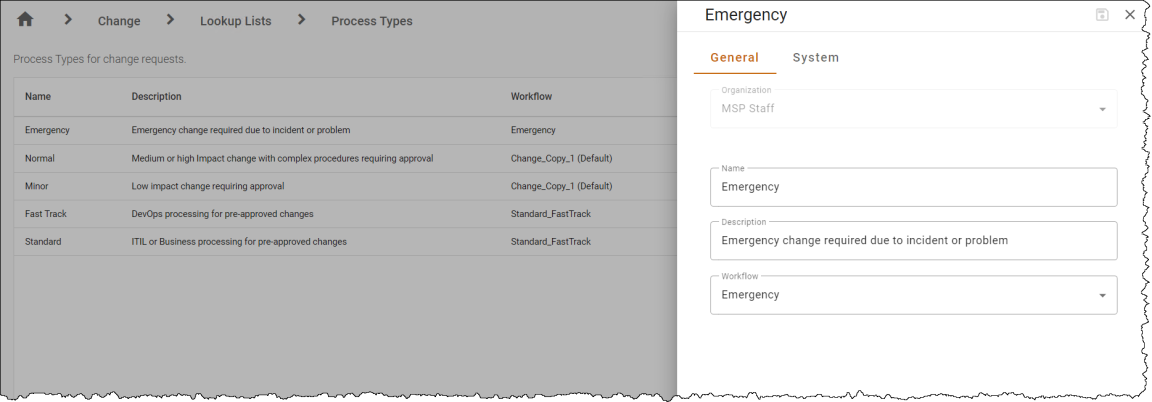
Select Lookup Lists > Process Types.
-
Configure the process types that you wish to make available to end users. For more information on configuring process types, see Process Types.
-
When configuring each process type, select the workflow that you wish to use for that type. If you wish to use the default workflow, choose the blank option.
TIP: Although you can combine any workflow with any process type, we recommend using combinations that accurately reflect your business needs. For example, the Fast Track process type uses a workflow with a limited number of States and Actions to facilitate rapid request fulfillment.
-
-
If necessary, add the ProcessType field to the form that you want to have multiple workflows available. For more information on adding fields, see How Do I Add a Field to a Form? in the Advanced Tools section of the Desktop Client (DT) Help.
When a user creates a new change request, they will be prompted to select a process type from the Process Type drop-down on the RFC form.